To see the latest changes, please check the change log.
The typical workflow when developing scripts for LAMMPS includes working with several programs. A text editor is needed to modify the scripts, the terminal to run LAMMPS, and programs like VMD or Ovito reading trajectories from a file dumped to the disk to visualize the system over time. If physical quantities are computed with LAMMPS, the data is often plotted with MATLAB or Python. This is a tedious process, especially for teaching purposes and for people who are new to LAMMPS.
We here introduce Atomify, a web editor running LAMMPS with real time visualization with stunning graphics, access to real time plotting of physical quantities and much more. After a simulation is finished, all files are available in a jupyter notebook that also runs in the browser.
How does it work?
LAMMPS is compiled to Webassembly using Emscripten so it can run in the browser. It runs with about 50% of the speed of natively compiled LAMMPS (single threaded). The visualization is built on top of three.js, with specialized high performance rendering of spheres and cylinders. The Jupyter notebook is Jupyterlite, and uses Pyodide, a Python runtime running entirely in the browser.
Customize example simulations
You can use this Github template to create your own set of simulations and Jupyter notebook analysis using Atomify. This does not require your own build or deployment of Atomify.
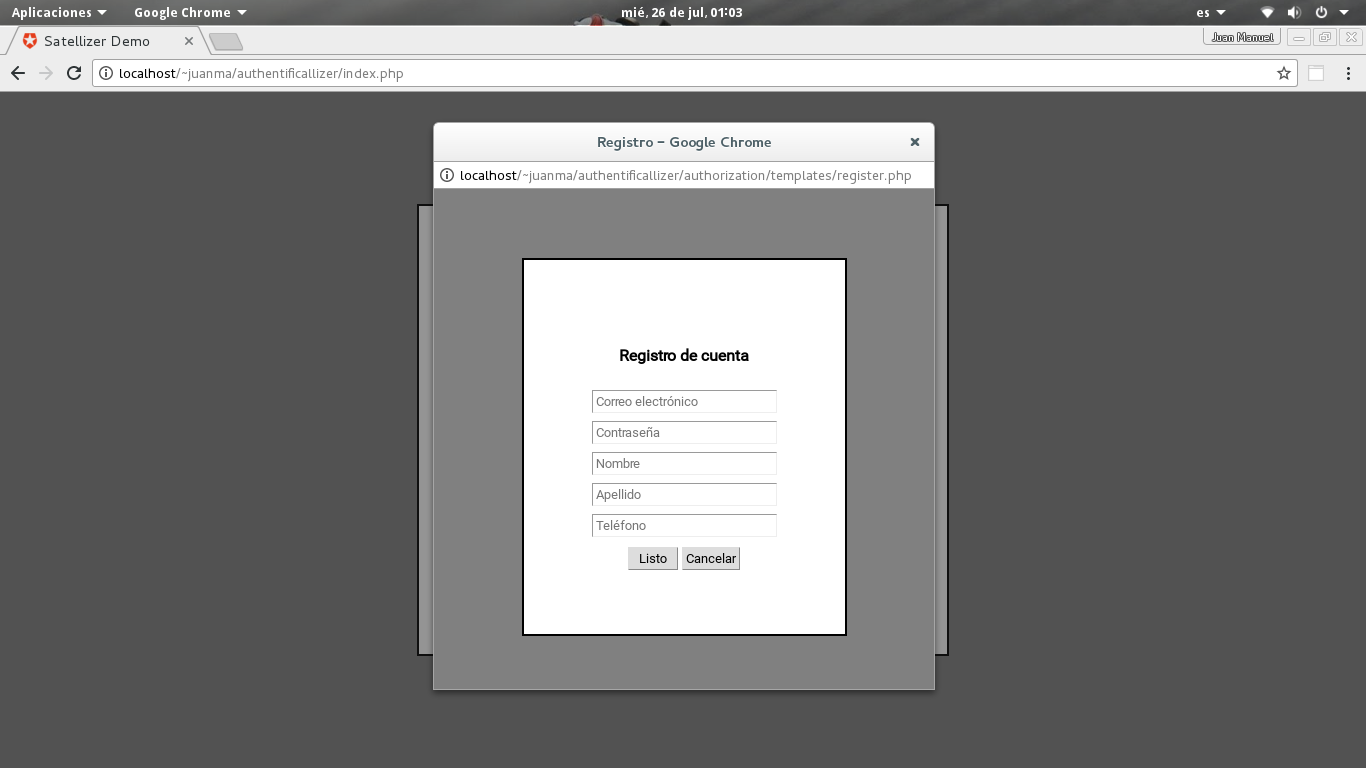
Los usuarios se encuentran en la tabla oauth_users definida en database/schema.sql. Puedes ampliarla a tu gusto pero no modifiques los campos existentes porque es usada internamente por la biblioteca oauth2-server-php para el grant_typepassword (RFC 6749: The OAuth 2.0 Authorization Framework, 1.3.3. Resource Owner Password Credentials). Las llamadas SQL se encuentran en authorization/model/user.php que es una clase que extiende un pequeño ORM muy simple que está en authorization/common/model.php.
Importante
Leé el instructivo hasta el final y sólo prueba cuando hayas terminado de configurar los proveedores que vas a utilizar para evitarte dolores de cabeza. Asegúrate de configurar correctamente todas las URL de redirección.
Yahoo no soporta localhost y tampoco permite múltiples URLs de redireccionamiento con lo cual deberás crear dos aplicaciones, una para producción y otra para desarrollo usando la dirección 127.0.0.1 en lugar del nombre localhost. Asegúrate de usar siempre el protocolo cifrado HTTPS.
Requerimientos previos
bower
composer
Dependencias adicionales
PHP debe soportar la extensión PDO.
Instalación
bower install
cd authorization/libraries
composer install
Configuración
Copia authorization/common/config-template.php a authorization/common/config.php y edita este último con los valores de configuración para cada proveedor y los datos de acceso a tú base de datos.
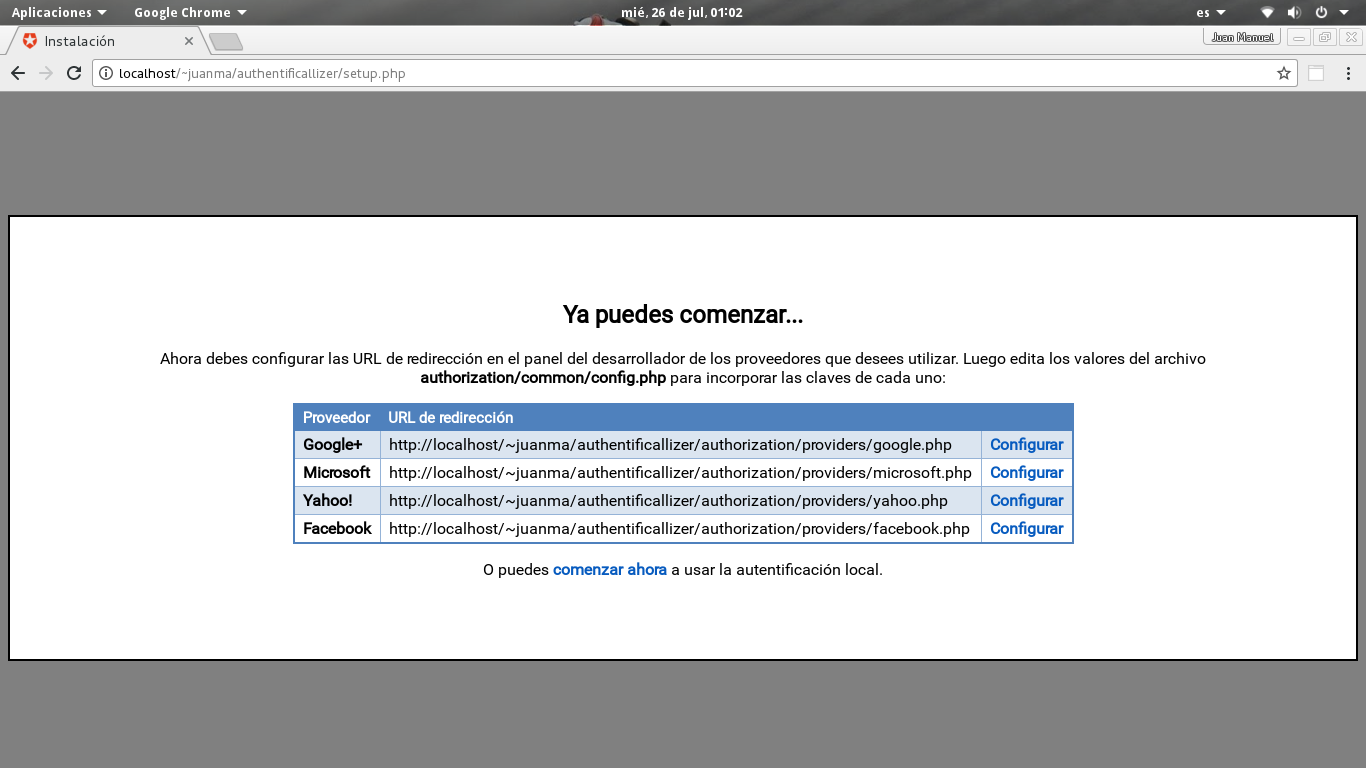
Ve a la dirección http://localhost/authentificallizer/setup.php para crear el esquema de tablas en la base de datos y configura la URL de redirección en cada proveedor.
Pendientes
Agregar más proveedores.
Permitir la instalación del lado del servidor con Composer.
Hacer un módulo para AngularJS y permitir la instalación del lado del cliente con Bower o NPM.
User-defined variables: topdeskBaseUrl, topdeskApiUsername and topdeskApiSecret created in your HelloID portal.
Description
This code snippet will archive an incident within TOPdesk and executes the following tasks:
Define a hash table $formObject. The keys of the hash table represent the properties necessary to archive an incident within TOPdesk, while the values represent the values entered in the form.
To view an example of the form output, please refer to the JSON code pasted below.
❗ It is important to note that the names of your form fields might differ. Ensure that the $formObject hash table is appropriately adjusted to match your form fields. See the TOPdesk API Docs page
Creates authorization headers using the provided API key and secret.
Archive an incident using the: Invoke-RestMethod cmdlet. The hash table called: $formObject is passed to the body of the: Invoke-RestMethod cmdlet as a JSON object.
update Waymo Open dataset processing instructions.
update project page.
Scene flow is an important problem as it provides low-level motion cues for many downstream tasks.
State-of-the-art learning methods are usually fast and can achieve impressive performance on in-domain data, but usually fail to generalize to out-of-the-distribution (OOD) data or handle dense point clouds.
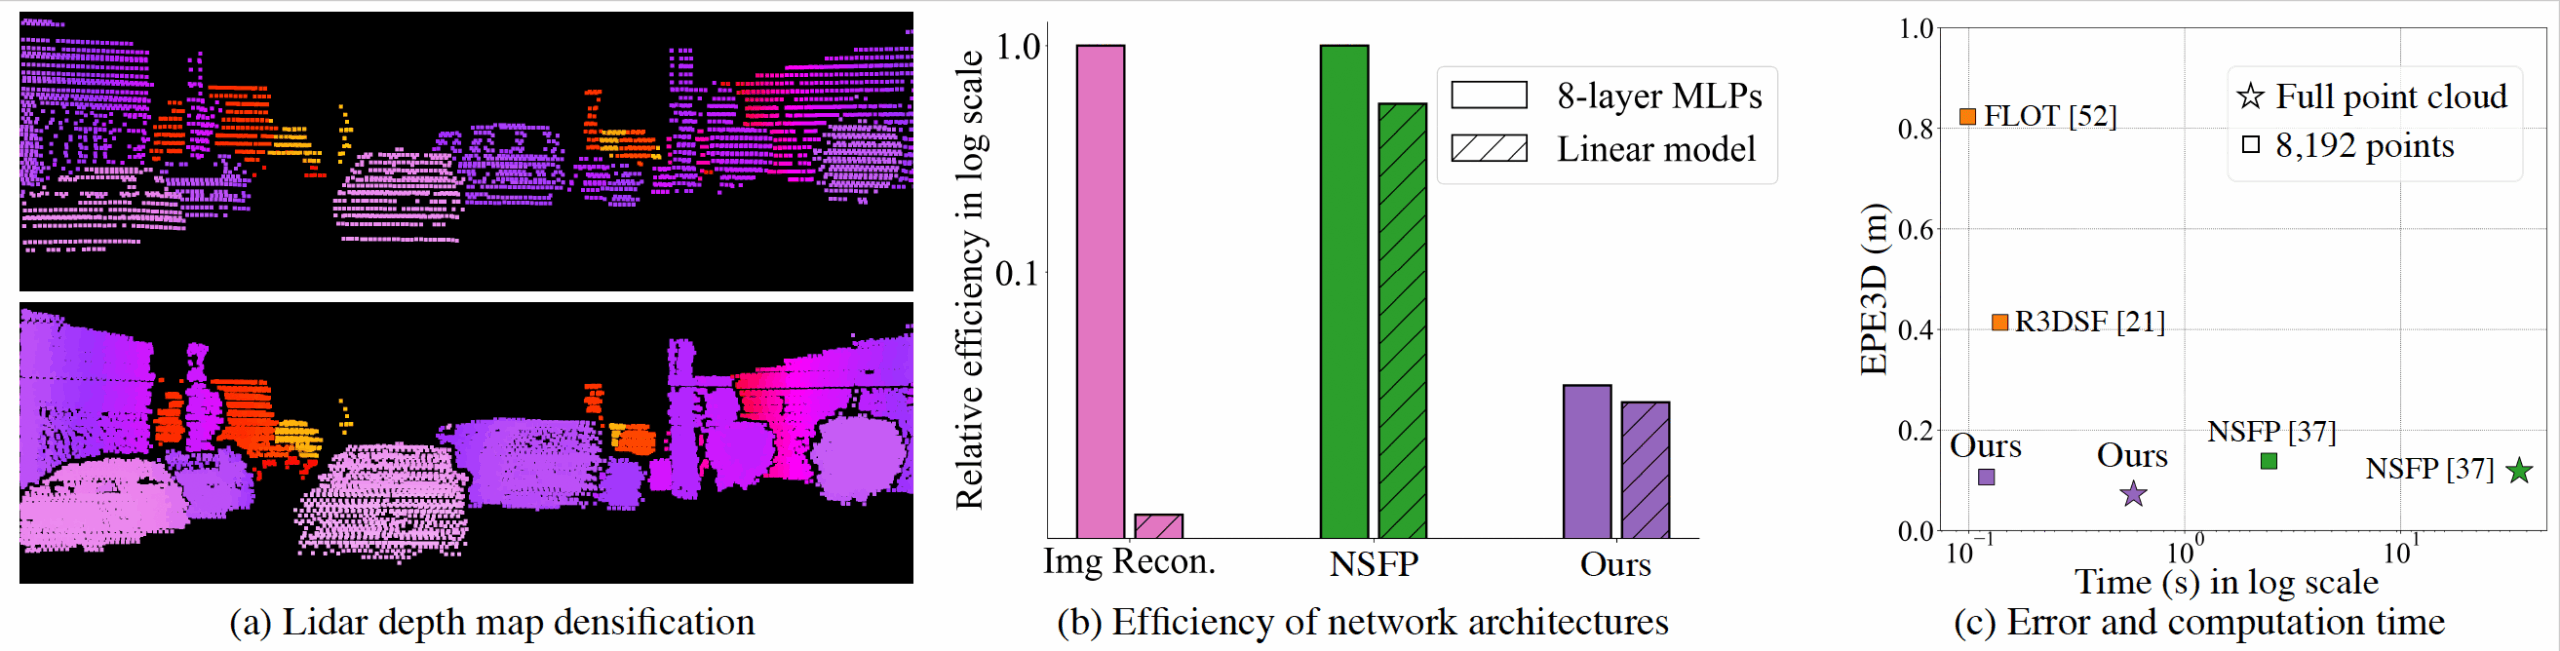
In this paper, we focus on a runtime optimization-based neural scene flow pipeline. In (a) one can see its application in the densification of lidar.
However, in (c) one sees that the major drawback is the extensive computation time.
We identify that the common speedup strategy in network architectures for coordinate networks has little effect on scene flow acceleration [see green (b)] unlike image reconstruction [see pink (b)].
With the dominant computational burden stemming instead from the Chamfer loss function, we propose to use a distance transform-based loss function to accelerate [see purple (b)], which achieves up to 30$\times$ speedup and on-par estimation performance compared to NSFP [see (c)].
When tested on 8k points, it is as efficient [see (c)] as leading learning methods, achieving real-time performance.
Prerequisites
This code is based on PyTorch implementation, and tested on PyTorch=1.13.0, Python=3.10.8 with CUDA 11.6 or PyTorch=1.12.0, Python=3.9.15 with CUDA 11.6.
But it should work fine with higher version of PyTorch.
A simple installation is bash ./install.sh.
For a detailed installation guide, please go to requirements.yml.
Dataset
We provide datasets we used in our paper.
You may download datasets used in the paper from these links:
After you download the dataset, you can create a symbolic link in the ./dataset folder as ./dataset/argoverse and ./dataset/waymo.
UPDATE: for Argoverse scene flow dataset preprocessing, please refer to Neural Scene Flow Prior; for Waymo Open scene flow dataset preprocessing, please refer to this instruction.
If you find the project useful for your research, you may cite,
@InProceedings{Li_2023_ICCV,
  title={Fast Neural Scene Flow},
  author={Li, Xueqian and Zheng, Jianqiao and Ferroni, Francesco and Pontes, Jhony Kaesemodel and Lucey, Simon},
  booktitle={Proceedings of the IEEE/CVF International Conference on Computer Vision (ICCV)},
  month={October},
  year={2023},
  pages={9878-9890}
}
update Waymo Open dataset processing instructions.
update project page.
Scene flow is an important problem as it provides low-level motion cues for many downstream tasks.
State-of-the-art learning methods are usually fast and can achieve impressive performance on in-domain data, but usually fail to generalize to out-of-the-distribution (OOD) data or handle dense point clouds.
In this paper, we focus on a runtime optimization-based neural scene flow pipeline. In (a) one can see its application in the densification of lidar.
However, in (c) one sees that the major drawback is the extensive computation time.
We identify that the common speedup strategy in network architectures for coordinate networks has little effect on scene flow acceleration [see green (b)] unlike image reconstruction [see pink (b)].
With the dominant computational burden stemming instead from the Chamfer loss function, we propose to use a distance transform-based loss function to accelerate [see purple (b)], which achieves up to 30$\times$ speedup and on-par estimation performance compared to NSFP [see (c)].
When tested on 8k points, it is as efficient [see (c)] as leading learning methods, achieving real-time performance.
Prerequisites
This code is based on PyTorch implementation, and tested on PyTorch=1.13.0, Python=3.10.8 with CUDA 11.6 or PyTorch=1.12.0, Python=3.9.15 with CUDA 11.6.
But it should work fine with higher version of PyTorch.
A simple installation is bash ./install.sh.
For a detailed installation guide, please go to requirements.yml.
Dataset
We provide datasets we used in our paper.
You may download datasets used in the paper from these links:
After you download the dataset, you can create a symbolic link in the ./dataset folder as ./dataset/argoverse and ./dataset/waymo.
UPDATE: for Argoverse scene flow dataset preprocessing, please refer to Neural Scene Flow Prior; for Waymo Open scene flow dataset preprocessing, please refer to this instruction.
If you find the project useful for your research, you may cite,
@InProceedings{Li_2023_ICCV,
  title={Fast Neural Scene Flow},
  author={Li, Xueqian and Zheng, Jianqiao and Ferroni, Francesco and Pontes, Jhony Kaesemodel and Lucey, Simon},
  booktitle={Proceedings of the IEEE/CVF International Conference on Computer Vision (ICCV)},
  month={October},
  year={2023},
  pages={9878-9890}
}
importinit,{beam_search,viterbi_search}from'fast-ctc';constfloatArr=[0.0,0.4,0.6,0.0,0.3,0.7,0.3,0.3,0.4,0.4,0.3,0.3,0.4,0.3,0.3,0.3,0.3,0.4,0.1,0.4,0.5,0.1,0.5,0.4,0.8,0.1,0.1,0.1,0.1,0.8];constalphabet=["N","A","G"];constbeamSize=5;constbeamCutThreshold=Number(0.0).toPrecision(2);constcollapseRepeats=true;constshape=[10,3];conststring=false;constqBias=Number(0.0).toPrecision(2);constqScale=Number(1.0).toPrecision(2);// On web, note the base path will be your public folderinit('fast_ctc_decode_wasm_bg.wasm');constviterbisearch=awaitbeam_search(floatArr,alphabet,string,qScale,qBias,collapseRepeats,shape);constbeamsearch=awaitbeam_search(floatArr,alphabet,beamSize,beamCutThreshold,collapseRepeats,shape);console.log(viterbisearch);// GGAGconsole.log(beamsearch);// GAGAG
$ git clone https://github.com/nanoporetech/fast-ctc-decode.git
$ cd fast-ctc-decode
$ pip install --user maturin
$ make test
JavaScript / Node
npm i
npm test
Note: You’ll need a recent rust compiler on your path to build the project.
By default, a fast (and less accurate) version of exponentiation is used for the 2D search. This can
be disabled by passing --cargo-extra-args="--no-default-features" to maturin, which provides more
accurate calculations but makes the 2D search take about twice as long.
Credits
The original 1D beam search implementation was developed by @usamec for deepnano-blitz.
fast-ctc-decode is distributed under the terms of the MIT License. If a copy of the License
was not distributed with this file, You can obtain one at https://github.com/nanoporetech/fast-ctc-decode/
Research Release
Research releases are provided as technology demonstrators to provide early access to features or stimulate Community development of tools. Support for this software will be minimal and is only provided directly by the developers. Feature requests, improvements, and discussions are welcome and can be implemented by forking and pull requests. However much as we would like to rectify every issue and piece of feedback users may have, the developers may have limited resource for support of this software. Research releases may be unstable and subject to rapid iteration by Oxford Nanopore Technologies.
A web app that shows average wait time on a bus stop for MiWay (Mississauga Transit) agency using their public GTFS feed. Work in progress.
Motivation
I like public transport, and I enjoy software engineering.
For a long time, I wanted to build a project that worked with data end-to-end.
From data ingestion throughout the analysis to the presentation to the external end user.
The only thing that stopped me was not finding an analysis topic I would want to dive into (low-effort excuse, I know, but it is what it is).
As I am growing an interest in public transportation and am a day-to-day user of it, I have recently found a topic I would like to explore – an average wait time at a stop.
You can track the project progress by reading “MiWaitWay” series on my engineering blog.
Deploying Airflow on Google Cloud VM
Pull repository
Start services with docker compose up -d
Create SSH tunnel from your local computer to VM instance. In this case, you will not need to expose AIrflow UI to the web.
better-redux-form primarily consists of three things:
A Redux reducer that listens to dispatched better-redux-form actions to maintain your form state in Redux.
A React component decorator that wraps your entire form in a Higher Order Component (HOC) and provides functionality via props.
Various Action Creators for interacting with your forms throughout the application.
Implementation Guide
Step #1
The first thing that you have to do is to give the better-redux-form reducer to Redux. You will only have to do this once, no matter how many form components your app uses.
import{createStore,combineReducers}from'redux'import{reducerasformReducer}from'better-redux-form'constreducers={// ... your other reducers here ...form: formReducer}constreducer=combineReducers(reducers);conststore=createStore(reducer);
Step #2
Decorate your form component with form(). This will provide your component with props allowing you to attach your inputs to better-redux-form.
importReact,{Component}from'react'importformfrom'better-redux-form'// Note:// if you use `require` don't forget to add `.default` to your import// const form = require('better-redux-form').defaultclassContactFormextendsComponent{render(){const{fields: {firstName, lastName, email}, handleSubmit}=this.props;return(<form><div><label>First Name</label><inputtype="text"placeholder="First Name"{...firstName}/></div><div><label>Last Name</label><inputtype="text"placeholder="Last Name"{...lastName}/></div><div><label>Email</label><inputtype="email"placeholder="Email"{...email}/></div><buttontype="submit"onClick={handleSubmit(data=>{// field data is passed through `data` parameter// your data processing logic hereconsole.log(data)})}>Submit</button></form>)}}ContactForm=form({// <----- THIS IS THE IMPORTANT PART!form: 'contact',// a unique name for this formfields: ['firstName','lastName','email']// all the fields in your form})(ContactForm)exportdefaultContactForm
That’s it! There is no Step #3!
If you’re starting out with better-redux-form, a good place to continue learning about how to connect up the inputs to redux-form would be the Basic Form Example.
a synchronous validation function that takes the form values passed into your component. If validation passes, it should return {}. If validation fails, it should return the validation errors in the form { field1: , field2: }. Defaults to (values) => ({}).
destroyOnUnmount: boolean
Whether or not to automatically destroy your form’s state in the Redux store when your component is unmounted. Defaults to true.
props: fields
The props listed on this page are are the props that better-redux-form generates to give to your decorated form component.
value: any
The value of the field, the type of which is dependent on what value is passed to the field.
get: (defaultVal?) => value
Get the value of field, if value is undefined defaultVal will be returned.
set/onChange: (val) => void
Set the value of field.
touched: boolean
true if the field has been touched.
error: string
A generic error for the entire form given by the error key in the result from the synchronous validation function.
props: handleSubmit
A function meant to be passed to . It will run validation, if the form is valid, it will call callback with the contents of the form data.
A simplified SNMP API for Java, inspired by Jürgen Schönwälder’s Tnm
extension for Tcl.
The original Tnm made it easy to write network management applications using
simple Tcl scripts. Tnm4j attempts to bring this same simplicity to the
task of writing network management applications in Java or in Java-based
scripting languages such as Groovy.
Running the Examples Using Docker
The src/examples/java subdirectory contains several examples.
Running the examples is easy if you have Maven and if you have or (or are
willing to install) Docker Desktop and Docker Compose on your workstation.
The src/examples/docker subdirectory contains a Dockerfile that can be
used to create a Linux-based container image that runs Net-SNMP, with
configuration that matches up with the src/examples/java/ExampleTargets. At
the base directory for this project, there is a docker-compose.yml that
can build and run the container for you.
Open a shell and navigate to the base directory for this project.
Run Docker Compose in the base directory.
docker-compose up --build
The first time you start up, you’ll see the container image being built.
Subsequently, when you run docker-compose up --build it should reuse
the cached image.
After the image is built, it will run and you’ll see the Net-SNMP console
output.
In another shell, navigate to the base directory for this project. In this
shell you’ll run an example using Maven as follows.
Maven will build the project and run the example class you specified. You
can run any of the examples in src/examples/java in this same manner.
After you’re done playing with the examples, go back to the first shell,
hit Ctrl-C on the keyboard and then
docker-compose down
You can save a little disk space by getting rid of the container image, too.
docker image rm tnm4j-netsnmp
Architecture
Tnm4j provides a lightweight façade over an SNMP adapter and a MIB parser
adapter. These adapters each implement a Tnm4j service provider interface to
adapt a third-party library for use with Tnm4j. The JDK’s ServiceLoader
mechanism is used to locate adapters for SNMP and MIB parsing support.
The default SNMP adapter uses Snmp4j by Frank Fock and
Jochen Katz. Snmp4j is an outstanding library providing comprehensive support
for SNMP communications in Java.
The default MIB adapter uses Per Cederberg’s excellent Mibble MIB parser.
Other SNMP providers or MIB parsers could be easily adapted for use with
Tnm4j by implementing the necessary SPI.
Trivial Example
The following example illustrates just a few of the features of Tnm4j. This
snippet retrieves and displays the name, description, and up time of an
SNMP-enabled network device.
Notice how the MIB and SNMP context objects are designed to work together?
This is arguably the most salient concept of Tnm4j. Tnm4j fully exploits
the MIB to make it easy for the developer to access management objects in
an SNMP agent. The developer can use MIB object names (instead
of SNMP object identifiers) when getting or setting object values, reducing
the time and effort required to get the desired management information.
The syntax and textual convention details from the MIB are used when
converting object values to strings. This is illustrated in the preceding
example — converting a retrieved value to a string in the appropriate
format is as simple as calling Varbind.toString().
Getting Started: Targets, Contexts, and Operations
In using Tnm4j, there are three fundamental objects you will use to interact
with SNMP agents: targets, contexts, and operations.
A target is a simple object that describes the relevant characteristics of a
remote agent necessary for communication. A target implements either the
SnmpV3Target, SnmpV2cTarget, or SnmpV1Target interface, depending on
whether the remote agent supports the SNMPv3, SNMPv2c, or SNMPv1 protocol,
respectively. These interfaces describe properties such as network address and
security characteristics of the remote agent. Tnm4j provides simple concrete
target implementations — SimpleSnmpV3Target, SimpleSnmpV2cTarget,
and SimpleV1Target — that your application can construct and configure
directly. Alternatively, your domain model objects representing network devices
could easily implement these interfaces, allowing your model objects to be used
directly as targets.
A context provides the ability to invoke SNMP operations on a given target.
You create a context using SnmpFactory and providing the target to the
factory method:
As shown in the preceding snippet, a context must (eventually) be closed, in
order to avoid a resource leak. Contexts are, however, lightweight objects
and it is quite reasonable to create and retain a context for as long as you
need to continue communicating with the target SNMP agent. Depending on the
needs of your application, this could be as short as the time needed to perform
a few SNMP operations, or perhaps for as long as the remote agent exists and
your application continues running. Tnm4j is used in applications that retain
thousands of context objects on the heap.
If you neglect to close a context, it will eventually be closed when your code
no longer holds any references to it — the underlying implementation implements
finalize to close the context if necessary. However, as it is difficult to
predict when a discarded context will be reclaimed by the JVM’s garbage
collector, it is a best practice to close a context before you discard the last
reference to it.
Performing SNMP Operations
Once you have a context for a given target, you can use the context to perform
SNMP operations on the targeted SNMP agent:
The preceding snippet uses the context to invoke a GET operation on the
remote agent and stores a reference to the retrieved variable bindings —
varbinds in SNMP speak. The numeric object ID used here (in case you
didn’t recognize it) is the SNMP sysUpTime object. When invoking an
operation, we can request an arbitrary number of SNMP objects; the operation
methods include variants which take a variable number of arguments or a
List.
If you’re wondering why we’re using numeric OIDs here instead of names,
just hang on… we’ll get there shortly!
In addition to the get, the context provides methods to support all of the
fundamental SNMP operations: GET, GETNEXT, GETBULK, and SET. Moreover, it
provides methods to support easy and efficient SNMP table walks, which we’ll
cover later. See the javadoc
for the full details.
You might have noticed there are quite a few gets in those two lines of code
inside of the try block. The snippet is written in the idiomatic style
recommended for Tnm4j, which is lean on syntax, and hides a lot of the
underlying details. Let’s break it down a little more to help you understand
what’s going on. We could rewrite the snippet a little more verbosely, like
this:
Now we can see that when we use get to perform a GET operation, the
return value is an SnmpResponse. If you check out the javadoc for
SnmpResponse
you’ll see that it has a single method (get) that retrieves the result of the
SNMP operation. The response object is patterned after the JDK’s Future
object — the get method will block until the result of the operation is
available. If the operation fails, the relevant exception will be thrown when
you try to get the result from the response object.
Assuming that the operation succeeds, the result we retrieve from the response
object is a VarbindCollection. This object
is not a subtype of the JDK’s Collection type. However, it has an interface
with methods that have familiar signatures supporting both list-like and map-like
access to the varbinds in the collection. In this example, we’re using a
list-like getter that takes an index — since we requested only one varbind in the
GET operation, there is exactly one varbind in the result (and it has index 0).
In addition to the access methods provided on the VarbindCollection
interface, you can use the asList or asMap methods to efficiently coerce
the varbind collection to a JDK List or Map. This feature is especially
handy when using Tnm4j with JavaEE’s expression language (EL) or in a
scripting language such as Groovy, which provides a lot of sweet syntax sugar
for lists and maps.
Using MIBs and Named Objects
One of the major benefits of Tnm4j is that it fully integrates the textual
description of SNMP managed objects known as the Management Information Base or
MIB. By loading one or more MIB module definitions, you can specify SNMP
objects by name when invoking operations and retrieving results.
In Tnm4j the Mib object is used to load MIB module definitions. You create
a Mib using MibFactory. When creating context objects you can specify the
MIB to be used by the context. All contexts sharing the same MIB have access
to the MIB modules loaded into the MIB.
Let’s rework our previous example, to make use of a MIB.
Note that not only do we ask for the sysUpTime object by name when invoking
the operation, we can also use the name to retrieve the value from the resulting
varbind collection.
If you’re reading closely, you might have noticed that we used getNext
to invoke a GETNEXT operation — in the previous example we used a GET
operation. The reason for this change involves something fundamental about the
way management objects are represented by SNMP.
A Brief Diversion on the topic of Object Indexes
In SNMP, every managed object type has a unique object identifier. For
example, the standard MIB includes an interface table with an object named
ifDescr that describes a network interface. The unique identifier of the
ifDescr object type is 1.3.6.1.2.1.2.2.1.2. Similarly, the sysUpTime
object type is identified as 1.3.6.1.2.1.1.3.
Every SNMP object instance has an index that is appended to the object
identifier for the object type. For an object like ifDescr this makes
sense — a network device often has many network interfaces, so SNMP needs to
be able to uniquely identify every instance of ifDescr (one per network
interface). The third instance of ifDescr (corresponding to the third
network interface managed by the agent) might have an index of 3, resulting in
an object instance identifier of 1.3.6.1.2.1.2.2.1.2.3; i.e. the type
identifier with .3 appended to the end.
What is often surprising to newcomers to SNMP, is that even object types with
singleton instances have an index. So sysUpTime, for which a given agent
only ever has one instance, must have an index. In SNMP, the index for
singleton object instances is 0. This index is appended to the end of the
object type identifier, just like any other index. In our first examples, we
used 1.3.6.1.2.1.1.3.0 as the object identifier to GET from the target agent.
Now we know that this identifier refers to the singleton instance of sysUpTime.
In our last example, we used a GETNEXT operation. Extracting out just the two
most relevant lines of code, we had this:
VarbindCollection result = context.getNext("sysUpTime").get();
System.out.println(result.get("sysUpTime"));
So why did we call getNext instead of get? In SNMP, the GETNEXT operation
returns the object instance whose identifier is the successor of the
identifier specified in the operation. Due to the fact that the index
subidentifier is appended to the object type identifier, the type
identifier is always the predecessor of the first instance of that type.
For example the type identifier for sysUpTime is 1.3.6.1.2.1.1.3, which
is always the predecessor of object 1.3.6.1.2.1.1.3.0 (the singleton
instance of sysUpTime). When we issue a GETNEXT for sysUpTime, the
agent returns its successor; namely sysUpTime.0.
You might be wondering if we could have also used a GET operation and specified
the object as sysUpTime.0. Indeed we could have done so, and the reason we
didn’t is mostly a question of style — using GETNEXT to retrieve instances
of singleton object types is the idiomatic choice in SNMP.
The other to thing to note about our example is that even though the retrieved
sysUpTime object instance has an index of 0, we retrieved it from the
result object (VarbindCollection) without specifying the index. The
collection could only contain one instance of any given object type, so making
you specify the index would be redundant. Coming up shortly, we learn how to
retrieve MIB tables (such as the standard MIB’s interface table). We’ll find
it very convenient that we don’t have to know the index of the row in order to
retrieve a row’s columns.
Setting Object Values
In addition to retrieving object values from a remote agent, we can set object
values. For example, we can set the value for the sysContact object by
invoking the set method on the context:
Notice that when specifying a variable binding to set an object value, we must
use an object instance identifier — in this case we are specifying the
identifier for the singleton instance of the sysContact object.
We pass one or more variable bindings to the set method. Each variable
binding associates a value with an object identifier. The context has a
factory method that creates Varbind objects given an object identifier and
an object value. The value you pass must be compatible with the data type
of the associated SNMP object.
We can also pass a VarbindCollection to the set method. This allows you
to fetch a current value for an object, change the value, and update it on the
remote agent:
SNMP represents tabular information by allowing a particular object type to
have many instances, each identified with a unique subidentifier appended to
the object type’s identifier. For example, in
A Brief Diversion on the topic of Object Indexes
we learned that the standard MIB’s network interface table has perhaps many
instances of the ifDescr object type; one for each network interface managed
by an agent.
They’re called “conceptual” tables, because their representation isn’t really
all that tabular. A table “column” is really just an object type, and because
of the way object instances are identified, all of the columns of a conceptual
table are siblings in the MIB tree, and all of the values of a column are
siblings in a subtree under the column’s type object. The concept of a “row”
really only arises from the way we specify which objects to retrieve in a
GET/GETNEXT operation.
Table Retrieval Using GETNEXT
Let’s start with an example that shows the most primitive (and slowest!) way
to retrieve all of the rows of a table — using the GETNEXT operation.
Assuming you’re already familiar with basic SNMP, this example should be fairly
obvious. We start with a getNext using the object type identifiers for
some of the columns of the standard MIB’s network interface table. Assuming
that there is at least one network interface managed by the target agent, we’ll
enter the while loop — if the result contains an ifName object then we
have a table row. In the loop body, after we extract and print the column
values for the current “row”, we ask the row object to produce a list of
object identifiers that will be used to request the next row and then perform
another GETNEXT operation.
This example also illustrates the common practice of including sysUpTime in
the list of object identifiers for each GETNEXT operation. This provides an
agent-centric time basis for computing rates for counters such as the input and
output octet counters. Including a singleton object type like sysUpTime
means that we can’t simply use all of the object identifiers for the current row
in the request for the next row — the successor to sysUpTime.0 is
sysContact.0! The nextIdentifiers method we call on the row object
(a VarbindCollection) provides a handy solution. We can provide it a list of
the non-repeating (singleton) objects in the collection, and it will produce
a list of object identifiers consisting of the specified non-repeating object
identifiers followed by the identifiers associated with the other (repeating)
objects in the collection.
It’s possible to ask for too many objects in a single GETNEXT request. We
check for that case by comparing the size of the row to the number of objects
we requested. Requesting too many objects in a single request is a programming
error, so we simply print an error message and exit the loop.
Table Retrieval Using GETBULK
If you ran the previous example to collect the interface table from a real
network device, you probably noticed that it’s a bit slow. Using GETNEXT, we
have to make a full round trip over the network for each entry in the target
SNMP agent’s interface table. You can probably imagine that this approach is not
going to work very well for a something like an IP route table that could contain
hundreds of thousands of rows.
In SNMPv2, the GETBULK operation was introduced to the protocol to provide a
solution for improving table retrieval performance. Conceptually, the GETBULK
operation allows us to perform the while loop in the previous example on the
remote agent itself. Just like GETNEXT, the GETBULK operation takes a list of
object identifiers. As we’ve seen, when executing the GETNEXT operation, the
agent returns the successor object instance for each of the specified object
identifiers. With GETBULK, the agent returns the next N successor object
instances for each of the specified identifiers.
We specify the maximum value for N as one of the parameters to the GETNEXT
operation; the protocol specification calls this parameter max-repetitions. The
value we specify indicates the maximum number of “rows” we want to retrieve in a
single GETBULK operation. Of course, the agent may choose to return fewer than
the number of rows we specify.
In our previous example using GETNEXT, we included sysUpTime in the request.
Since GETBULK effectively performs N GETNEXT operations, we need a way to tell
it that some of the object identifiers in the request are for non-repeating
objects. The GETBULK operation includes a non-repeating parameter for this
purpose — this parameter is used to indicate that the first k identifiers
in the list are for non-repeating object types.
Performing a GETBULK operation with Tnm4j is easy enough:
The first parameter to getBulk indicates that there is one non-repeating
object type in the list (sysUpTime). The second parameter indicates that we
want the agent to return as many as 10 rows for the specified columns of the
interface table. The remaining parameters identify the object names we wish to
retrieve. The return value from getBulk is a list of VarbindCollection
objects. Based on the parameters specified in this example, the list will
contain as many as 10 collections — one per retrieved row.
By now you’re probably wondering, How will I know what to choose as the
maximum number of repetitions? In general, there is no way to know the number
of rows in a conceptual table without actually retrieving it. So the answer
is that you’re going to have to make a guess. Guessing will have two potential
consequences. Our guess could be too small, in which case there will be more
rows in the table that our GETBULK operation did not retrieve — in this case
we’ll want to do one or more subsequent GETBULK operations to complete the
retrieval. Our guess could be too big, in which case GETBULK might end up
retrieving objects that aren’t part of the table we wanted to retrieve — in
this case we’ll need to discard the stuff we didn’t really want.
Complicating matters even further, the number we choose is just a hint to the
remote agent. It may choose to return fewer than the number we specified. Even
worse, the remote agent is allowed to return a partial last row — i.e. it is
allowed to truncate the last row if the entire row won’t fit neatly into an SNMP
PDU.
If all of this is making you feel like you’ll just deal with the poor
performance of table retrieval using GETNEXT, we have good news! In the next
section, we discuss using Tnm4j’s high level table walk operation, which
allows you to get all of the performance benefits of using GETBULK to
retrieve tables, without the complexity of using GETBULK directly.
If we take all of these facts into consideration, we can write a table retrieval
loop that uses GETBULK something like this:
Mib mib = MibFactory.getInstance().newMib();
mib.load("SNMPv2-MIB");
mib.load("IF-MIB");

SimpleSnmpV2cTarget target = new SimpleSnmpV2cTarget();
target.setAddress("10.0.0.1");
target.setCommunity("public");

SnmpContext context = SnmpFactory.getInstance().newContext(target, mib);
try {
  final int maxRepetitions = 10;

  final String[] columns = {
      "sysUpTime", "ifName", "ifDescr", "ifAdminStatus", "ifOperStatus",
      "ifInOctets", "ifOutOctets"
  };

  List<VarbindCollection> rows =
      context.getBulk(1, maxRepetitions, columns).get();

  outer:
  while (!rows.isEmpty()) {
    VarbindCollection lastRow = null;
    inner:
    for (VarbindCollection row : rows) {

      if (row.get("ifName") == null) break outer;    // doesn't look like ifTable columns

      if (row.size() < columns.length) break inner;  // truncated row... discard it and try again

      lastRow = row;
      System.out.format("%14s %-8s %-20s %-4s %-4s %,15d %,15d\n",
          row.get("sysUpTime"),
          row.get("ifName"),
          row.get("ifDescr"),
          row.get("ifAdminStatus"),
          row.get("ifOperStatus"),
          row.get("ifInOctets").asLong(),
          row.get("ifOutOctets").asLong());
    }
    if (lastRow == null) {
      // if this is the first row, we're asking for too much in a single row
      System.err.println("truncated first row; too many objects requested");
      break outer;
    }
    rows = context.getBulk(1, maxRepetitions,
        lastRow.nextIdentifiers("sysUpTime")).get();
  }
}
finally {
  context.close();
}
(You know an algorithm is messy when you find yourself needing labeled break
statements!)
In the first couple of lines inside of the try block, we set up for the first
getBulk request. We put the identifiers into an array so we can later use
the array’s length to check for a truncated row. Our array contains sysUpTime
so in the call to getBulk we indicate that there is one non-repeating object
at the front of the list.
The loop labeled outer is going to be used to keep doing getBulk calls until
there are no more rows available (or we fall out the loop because we’ve reached
the end of the table).
The loop labeled inner inspects each of the rows to make sure it is still
actually looking at the table we want (the interface table) and to make sure the
current row hasn’t been truncated by the agent. Assuming the row is good, we
print its contents. In order to be ready to do the next call to getBulk we
need to keep track of the last complete row we processed, so we can use the
identifiers in it as the starting point for the next GETBULK operation — we
assign the row to lastRow for this purpose.
If we fall out of the inner loop without having processed at least one full
row, that means we’re asking for too many objects in a single request — we did
something similar in our example using GETNEXT.
At the bottom of the outer loop we use the identifiers in the last full row
for the next call to getBulk. This means that the next GETBULK operation will
pick up right where the last one left off.
Table Retrieval Using Tnm4j’s High-Level Walk Operation
As we saw in the previous section, retrieving a full table using GETBULK is
tricky. For this reason, Tnm4j includes a high-level walk operation that
uses GETBULK under the covers, but presents an iterator-like interface to your
code.
Here’s an example of the same retrieval of the standard interface table we used
in the preceding examples, using Tnm4j’s walk operation:
As you can see, using walk is the easier than using either GETBULK or GETNEXT.
We obtain an SnmpWalker object from the context, using the walk method with
a parameter list that is essentially the same as what we used for getBulk; the
first parameter is the number of non-repeating object types in the list, followed
by the names of the non-repeating objects (just sysUpTime), followed by the
names of the columns we want to retrieve from a table. The walker has a next
method that executes GETBULK operations with the remote agent as needed to
retrieve all of the rows from the table.
While not shown here, the return value from next is an SnmpResponse
just as it is for any other operation. We invoke get on the return value
from next in order to get the VarbindCollection representing the next row.
When get returns null the walk is complete. Just as it does for other
operations, get will throw an exception if an error occurs in performing the
underlying operations with the SNMP agent.
Because the high-level walk operation is implemented directly on top of Tnm4j’s
SNMP provider, it performs better than any table retrieval operation that you
could write using the getBulk operation.
If you thought writing table retrieval using GETBULK was tricky, imagine writing
an asynchronous implementation that doesn’t block while waiting for the response
to a GETBULK request! The good news is that you won’t have to write that code
yourself, because Tnm4j has done it for you. Just as it does for all of the
native SNMP operations, Tnm4j provides an asynchronous variant of the high level
walk operation. This allows you to walk arbitrarily large tables without
blocking, and allows concurrent retrieval of tables from multiple agents without
requiring a retrieval thread per agent. See Asynchronous Operations
for details.
Accessing Table Index Objects
In SNMP version 2, the management information structure for tables was changed
such that all index objects for tables are specified as not-accessible. Tables
that were defined prior to this change (such as the interface table of the
standard MIB) continue to provide accessible index objects, but all other
tables are subject to this restriction. This restriction makes the agent
implementation more efficient, but greatly complicates the work of the network
management application.
Table index objects often contain information that is important to network
management applications. For example, suppose that our management application
wants to use the IPV6-MIB to obtain the
IPv6 addresses that are configured on the interfaces of a network device. The
ipv6AddrTable contains the information that we’d like to retrieve. If you
review the definition of this table, you’ll note that the most important pieces
of information in this table — the interface index and the address itself —
cannot be retrieved from the table; the ACCESS-TYPE of these objects is
not-accessible.
Tnm4j makes it easy to access this information (which is encoded in the object
identifiers of the other objects in the table), as shown in the following
example:
When using any of the context’s low-level or high-level operation methods,
the index objects are implicitly available in the resulting VarbindCollection,
even though they were not (and cannot) be among the objects retrieved from the
table. Note that this feature requires that you load the relevant MIB(s) and
provide the resulting Mib object to your context object(s).
The Varbind.getIndexes method also provides access to a table object’s
indexes.
Asynchronous Operations
Tnm4j fully supports asynchronous SNMP operations. When using asynchronous
operations, your application does not block while waiting for a response from
an SNMP agent. Tnm4j’s asynchronous operations support can support concurrent
communication with hundreds or even thousands of SNMP agents using just a few
service threads.
Asynchronous operations are a key ingredient for writing responsive SNMP network
management applications that scale to support real networks. Communication with
SNMP agents can be handled in the background, while application users continue
to interact with the application’s user interface.
Effective use of asynchronous SNMP operations in Tnm4j requires a solid
understanding of Java’s facilities supporting concurrency: threads, locks,
conditions, and the like.
The SnmpContext interface provides async- methods for each of the low level
SNMP operations and the high-level walk operation: asyncGet, asyncGetNext,
asyncGetBulk, asyncSet, and asyncWalk.
Example: An asynchronous GETNEXT operation.
Let’s look at example that uses an asynchronous GETNEXT operation to retrieve
the sysName and sysUpTime objects from a target SNMP agent. The setup
looks very similar to our prior examples, with one salient difference:
Mib mib = MibFactory.getInstance().newMib();
mib.load("SNMPv2-MIB");

SimpleSnmpV2cTarget target = new SimpleSnmpV2cTarget();
target.setAddress(System.getProperty("tnm4j.agent.address", "10.0.0.1"));
target.setCommunity(System.getProperty("tnm4j.agent.community", "public"));

SnmpContext context = SnmpFactory.getInstance().newContext(target, mib);

SnmpCallback<VarbindCollection> callback = new ExampleCallback();
context.asyncGetNext(callback, "sysName", "sysUpTime");

// go do something else while waiting for the callback
When using an asynchronous SNMP operation, we must provide a callback that will
be notified when a response is available from the remote SNMP agent. In the
example we construct an ExampleCallback (that we’ll see in just a moment). We
invoke asyncGetNext on the context, passing a reference to our callback and
the list of objects we wish to retrieve. After we initiate the GETNEXT request
our application can go on to do some other work — the callback will be invoked
later (via a different thread) when a response is available.
The callback implements the SnmpCallback<VarbindCollection> interface. In our
example implementation below, we simply print the objects received from the
remote agent.
When we previously looked at the get method in detail, we observed that its
return value is SnmpResponse<VarbindCallback> — when an invoking a
synchronous SNMP operation, we get an SnmpResponse which contains a
VarbindCollection result. In an asynchronous operation, the callback is
provided an event object that contains an SnmpResponse (which in turn
contains a VarbindCollection). The event object also provides a reference
to the same context object that was used to invoke the operation.
As we noted previously, the response object is patterned after the JDK’s
Future object. When we invoke get the response object can block until a
response is available. However, when we invoke get on the response object
inside of our callback, it will never block — the callback is not invoked
until a response is available.
If a timeout or other error occurs while executing the asynchronous operation,
the call to get on the response object will throw an appropriate exception. This
allows our callback to handle the exception using an ordinary try block.
In this example, the context object is closed before the callback returns. As
we discussed previously, context objects are lightweight, but should be closed
when no longer needed. In our example, after the callback is finished, we don’t
need the context any more so we close it. In your design, you might choose to
retain the context for subsequent operations, and that’s fine too — you just
need to close the context when it really is no longer needed.
If you plop this example into a main method, as is, you’ll probably find that
it exits without printing anything. Because our example doesn’t really have
anything else to do, it terminates before the response is received from the
remote agent. In a real application, this won’t be a problem — you wouldn’t
use asynchronous operations if the application didn’t have better things to do
than hang around waiting for a response from the remote SNMP agent.
To make the example work, you could easily add a Thread.sleep after the call
to asyncGetNext to put the main thread to sleep for long enough for a response
to be received. This is imprecise, but good enough for this silly example. In
the example code provided with Tnm4j, the callback is modified so that the
main method can block until a response is received.
Using a Completion Service to Collect Results
Often, in creating network management applications you will write code that
simply needs to collect and record information from many different SNMP agents.
An SnmpCompletionService can be used to simplify this work. The completion
service provides provides a submit method to which you can submit
SnmpOperation object instances for asynchronous execution. The service has a
queue like interface that you can use to retrieve SnmpEvent objects for
completed operations, in either a blocking on non-blocking manner.
In addition to the methods such as getNext and asyncGetNext that directly
execute SNMP operations, SnmpContext provides factory methods that create
SnmpOperation objects. An operation object provides two overloads of its
invoke method, providing for either synchronous or asynchronous execution. You
can create operation objects for operations you wish to perform, and delegate the
handling of the callback. SnmpCompletionService is designed around this
concept.
Suppose we wanted to collect sysName and sysUpTime from many different
network devices. Here’s an example of how we might accomplish this using a
completion service:
The basic structure of the main body of our example is quite simple. We submit
operations on different network devices to the completion service, and then
remain in the loop until all of the results have been obtained. While the
example simply uses a few hard-coded agent addresses, we could easily imagine
looking those details up in a database and submitting operations to the
completion service for all of the devices in our network.
In the loop body, we can see that the take method on the completion service
returns an SnmpEvent object, which we saw in the callback of our previous
example. The take method blocks until the next event describing a completed
operation becomes available. We extract the result from the event and print the
information requested by the operation. Since we’re done with the context
associated with the event, we close it.
As we’ve seen in previous examples, we create a target that describes the
SNMP agent on which we wish to execute an operation. We use SnmpFactory
to obtain a context for our target, and we use the newGetNext factory
method to obtain an SnmpOperation that will perform a GETNEXT for the sysName
and sysUpTime objects.
The context interface provides factory methods such as newGetNext for all of
the SNMP operations. An SnmpOperation encapsulates a context, an operation,
and a list of SNMP objects on which the operation is to be performed. An
operation can be invoked either synchronously or asynchronously. When you
submit an operation to an SnmpCompletionService, the service invokes the
operation asynchronously, providing a callback that will be used to queue the
responses, making them available via the public API of the service.
Receiving SNMP Notifications (Traps, Informs)
SNMP agents can be configured to send notifications to a management application
when certain events occur. For example, the standard MIB defines events that
can notify a management application when a network link managed by an agent
transitions to an up or down state, or to notify the application when an agent
or the network device it is managing is restarted. Tnm4j makes it easy to
respond to notifications received from SNMP agents in some manner that is
appropriate for your network application.
SNMP defines two different notification types; TRAP and INFORM. An INFORM must
be acknowledged by the recipient, allowing the agent to be assured of its
delivery. For the agent, a TRAP is purely fire and forget — the agent does not
concern itself with whether a TRAP is actually received by any management
application. In Tnm4j, the underlying SNMP provider takes care of acknowledging
receipt of INFORM events, so the difference between TRAP and INFORM notifications
is completely transparent to your application.
Tnm4j defines two fundamental objects for handling notifications from SNMP
agents; listeners and handlers.
A listener is an instance of SnmpListener and is responsible for collaborating
with the underlying SNMP provider to receive and route inbound notifications
from remote agents to your application. Listener objects are created by
SnmpFactory. A listener is configured to listen for notifications addressed
to a particular port address. If your application needs to listen on more than
one port address, you create a listener for each address.
The default port used by a listener is UDP port 162, which is defined as the
standard notification port for SNMP. On most operating systems, this is
a privileged port and can only be used by processes with superuser access.
If a BindException is thrown when attempting to add a listener, try
specifying a port number greater than or equal to 1024 (and less than 65536).
A handler is responsible for doing something useful with a received notification.
Handlers implement the SnmpNotificationHandler interface. This interface
declares a single handleNotification method that receives an event object
that describes a notification and the agent from which it was received.
Here’s an example of the basic setup:
Mib mib = MibFactory.getInstance().newMib();
mib.load("SNMPv2-MIB");

SnmpListener listener = SnmpFactory.getInstance().newListener(10162, mib);
try {
  listener.addHandler(new SnmpNotificationHandler() {
    @Override
    public Boolean handleNotification(SnmpNotificationEvent event) {
      System.out.println("received a notification: " + event);
      return true;
    }
  });

  Thread.sleep(60000L);     // wait for some notifications to arrive
}
finally {
  listener.close();         // listeners must be closed when no longer needed
}
The notification event object contains an SnmpNotification that provides the
details of the received INFORM or TRAP. The getType method can be used to
determine the notification type. Legacy SNMPv1 traps are a little
different than SNMPv2 INFORM and TRAP notifications. When the trap type is
TRAPv1, you may safely cast the notification object to SnmpV1Trap to access
the additional properties defined for an SNMPv1 trap.
On most Unix hosts, you can use the snmptrap and snmpnotify commands
(which are part of the Net-SNMP package) to test your notification handler.
For example, the following shell commands can be used to send our example
handler an INFORM, TRAP, and a legacy SNMPv1 TRAP, respectively:
snmpinform -v 2c -c public localhost:11162 {} 1.2.3.4 sysUpTime.0 t 218128
snmptrap -v 2c -c public localhost:11162 {} 1.2.3.4 sysUpTime.0 t 218128
snmptrap -v 1 -c public localhost:11162 enterprises.1446 10.0.0.1 0 0 ''
See the man pages for these commands for more details on how to use them to send
notifications.
A given listener supports an arbitrary number of handlers and orders them
according to a priority specified when each handler is registered. The
listener-handler interaction is designed around the strategy pattern. When a
notification is received, handlers are notified in priority order. Each handler
is allowed to inspect the notification and decide whether to handle it. The
first handler that returns true is the last handler that will receive the
notification. See the javadoc for
SnmpListener
for more information.
The strategy-based design allows you to easily write highly cohesive
notification handlers, each focused on handling a particular kind of
notification, rather than having a single handler with hard-to-test (and
hard-to-debug) conditional logic for sorting out what kind of notification was
received and what do about it.
Best Practices
When using Tnm4j in an application, there are a few other best practices that
you should observe.
Close the SnmpFactory Before Exit
SNMP operations invariably involve waiting for things to happen, and in Java,
waiting invariably involves thread management. The singleton SnmpFactory
instance holds references to a couple of thread pools used for making SNMP
requests and scheduling timeouts. In order for your application to exit
cleanly, your code must eventually invoke close on the SnmpFactory instance.
In a JavaSE application you can register a shutdown hook via the Runtime
class to close the factory instance as shown here.
In a JavaEE application or in similar frameworks such as Spring, you can use
a method annotated using @PreDestroy in one of your application beans to
close the SnmpFactory, as shown below.
Inject SnmpFactory as a Dependency
SnmpFactory provides a singleton instance via its getInstance() method,
to make it relatively easy to use in simple Java SE applications. However, when
using Tnm4j in an application framework such as Java EE, CDI, or Spring that
supports dependency injection, you should create some form of producer method
and use it to inject an SnmpFactory instance into beans that require it. This
simplifies application design and makes it possible to mock the SnmpFactory
for testing.
Using CDI (with or without Java EE), you can easily create a bean that acts
as a producer for the SnmpFactory instance.
In addition to providing an init method to create and store a reference to
the SnmpFactory instance, this bean also illustrates the best practice of
closing the factory when it is no longer needed.
Having defined a producer bean, you can then use standard dependency injection
to get the SnmpFactory instance into any bean that needs it.
Use a ManagedThreadFactory in Java EE Applications
Java EE containers generally want to manage all resources used by an
application, including any threads that the application needs to create. The
SnmpFactory instance in Tnm4j needs to create threads to make SNMP requests,
wait for results, and to dispatch control to user-provided callbacks when
performing asynchronous SNMP operations.
As of Java EE 7, a Java EE container is obligated to provide a default
ManagedThreadFactory instance that can be injected into application beans
using an @Resource annotation. Most containers will also allow an administrator
to define additional managed thread factory instances that can be injected
into an application bean by specifying a JNDI name with the @Resource
annotation.
It is a best practice, when using Tnm4j in a Java EE environment, to use a
ManagedThreadFactory instance when creating the SnmpFactory instance.
A simple approach to ensuring that Tnm4j uses a managed thread factory is to
define a singleton EJB that is instantiated at application startup, as follows.
Notice that this approach extends the prior example of using dependency
injection to provide the SnmpFactory instance. It differs only in that it is
an EJB and it initializes the SnmpFactory using a managed thread factory.
Welcome to the backend repository of my Snapchat-Face-Filter project! This repository contains the backend code that complements the main Snapchat-Face-Filter repository.
Prerequisites
Before running the project, make sure you have the following installed:
Open your preferable Code Editor ( I would suggest using VS Code )
Click Terminal -> New Terminal
Run the Command git clone https://github.com/ayush4460/Snapchat-Filter-Backend.git in the Terminal
Git will start cloning the repository to your local machine -> Cloning into Snapchat-Filter-Backend...
Once the cloning process is complete, you will have a local copy of the repository in the specified directory.
Navigate to the project directory: cd Snapchat-Face-Filter-Backend
Install the dependencies: In my case, no need to install dependencies.
Still facing issues with the dependencies, run the following command in the terminal: npm i cors express nodemon socket.io
Start the server:
Start the server using the following command in the Terminal: npm start
The server will start running on http://localhost:3000.
Open the website:
Open your web browser and enter http://localhost:3000 as the URL. You will be able to access the website and interact with it.
API Endpoints
Take picture: Send a request to take a picture with the specific device.
Enter the following URL to hit the Take Picture API: http://localhost:3000/api/take_picture/:deviceId
GET /api/take_picture/:deviceId
The deviceId is 111 in my case, you can change it from the code and take any deviceId
If u change the deviceId, just make sure to update it in the URL when accessing the API
Change filter: Send a request to update the filter of the specific device.
Enter the following URL to hit the Change URL API: http://localhost:3000/api/filter/:deviceId/:filterId
GET /api/filter/:deviceId/:filterId
Currently, I have added 3 filter their filterIds are '2','3' & '4'
Update the filterId accordingly in the URL mentioned above to hit the API for that particular filter
The deviceId is 111 in my case, you can change it from the code and take any deviceId
If u change the deviceId, just make sure to update it in the URL when accessing the API
Contributing
Contributions are welcome! If you find any issues or have suggestions for improvements, please open an issue or submit a pull request.
Steps for Contributing:-
Fork the repository on GitHub.
Clone your forked repository to your local machine.


 https://github.com/andeplane/atomify