Welcome to Food App! This Java-based application utilizes XML for user interface design. Food App connects users with food suppliers, providing a convenient shopping and ordering experience. It includes intelligent features such as a Wit.AI-powered chatbot and admin management.
Features
Product Search
Users can easily search for food products by name, category, or keywords.
Clear search results help users quickly find what they need.
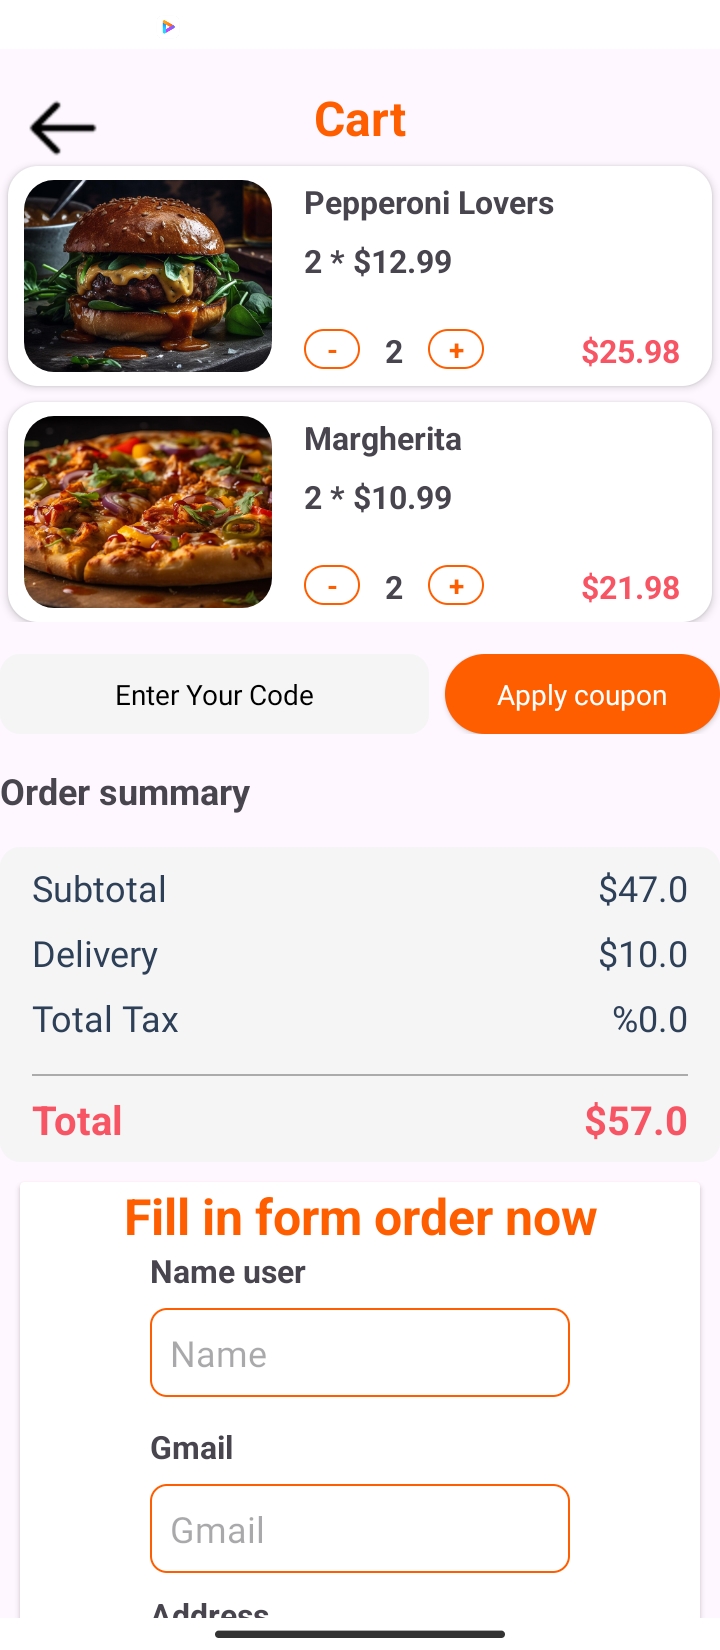
Ordering
Food App allows users to order food products from suppliers.
The ordering process is simple and straightforward, including cart review, payment method selection, and order confirmation.
Smart Chatbot
Using Wit.AI AI technology, the chatbot in Food App interacts and addresses user queries.
The chatbot provides product information, assists with ordering issues, and supports customer service.
Admin Management
Admin can manage product listings, orders, and user information.
An easy-to-use interface enables efficient addition, modification, and deletion of information.
User Profile Management
Users can manage personal information, delivery addresses, and purchase history.
Editing and updating information is straightforward from the user interface.
Installation and Deployment
System Requirements
Android Studio version X.X.X or higher.
JDK version X.X or higher.
Install Firebase and configure your project in Firebase Console.
Deployment
Clone the Repository:
Open Project in Android Studio:
Import the project into Android Studio.
Configure Firebase for your project (refer to Firebase documentation).
Configure Wit.AI API:
Register and obtain API key from Wit.AI.
Configure the source code to connect with the chatbot.
Build and Run the Application:
Build and run the application on an emulator or physical device.
Contributions and Feedback
If you have any suggestions or bug reports, please open an issue on our GitHub repository. We welcome contributions from the community to improve Food App.
Image of application
Start
Main
Order
Order
User
Edit profile
Sign In
Sign Up
Author
Food App is developed by Võ Thanh Sang, with support from the open-source community and cutting-edge technologies.
Thank you for your interest in and usage of Food App. We hope you have an enjoyable and convenient shopping experience! 🍲📱
// You also can use react-atom-styled hereimportatomfrom'react-atom-emotion';import{designTokens}from'./designTokens';exportconstAtom=atom(designTokens);
Build application atomically with your design tokens
import{Atom}from'./Atom';exportdefaultfunctionApp(){return(<Atomw="fullW"h="fullH"flexflexDirection="column"flexJustify="center"flexAlign="center"gap="1x"c="primary"bg="background"><AtomfontSize="xxl"fontWeight="bold">
Hello, React Atom!
</Atom><AtomfontSize="md">Build application atomically with your design!</Atom></Atom>);}
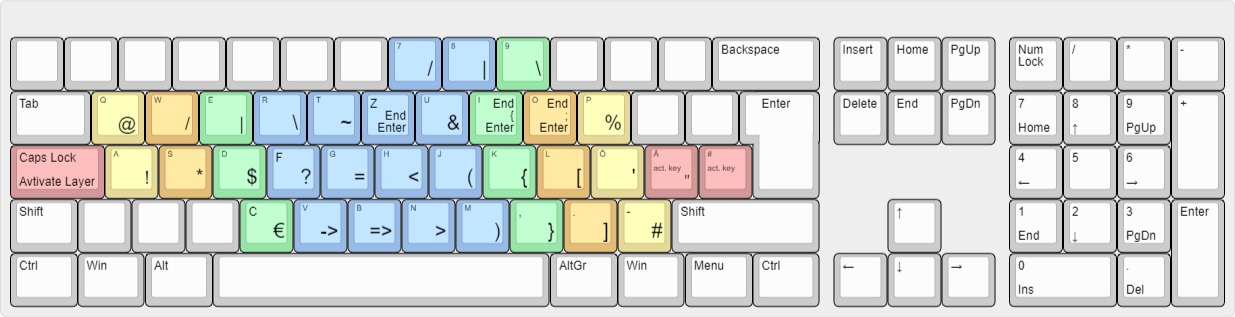
A Keyboard Layout based on Standard German QWERTZ with the addition of two layers.
To use the script, you have to install AutoHotKey.
A lot of characters on the German keyboard which you need for programming are not accessible very well.
The script adds two layers to the keyboard.
One layer is for easy access to those characters which are needed all the time for programming.
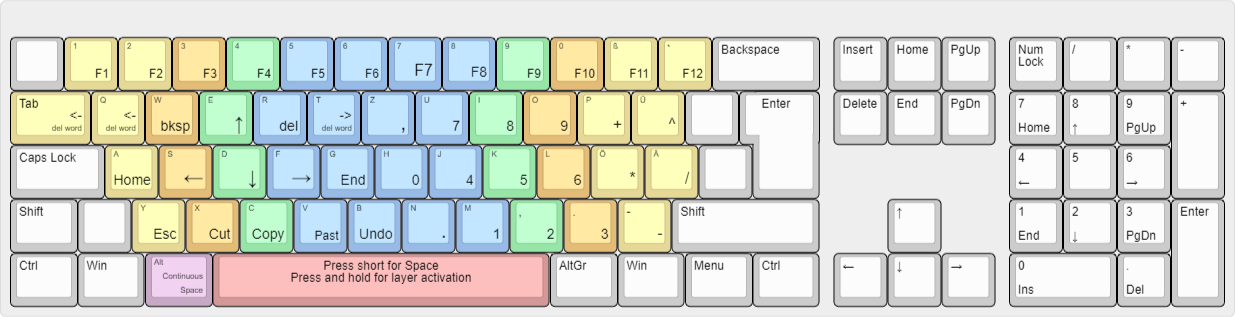
The other layer controls the cursor and have a numberblock.
The script is adapted to German keyboards. But it can be easily adapted to other keboards or your own needs.
I realised, that with that script using a QWERTY Keyboard and installing the German keyboard layout under Windows is more convenient, because
it is easier to reach the left SHIFT and the RETURN Key.
Because of the fact that the SPACE and ä keys are used to switching the layer they will fire upon release.
The advantage is that although the keys will fire upon release, it will do so only if you did not press any other key while it was held down.
The following layer can be activated by holding Caps Lock, ä or # down. The normal functionality of Caps Lock and the key # is deactivated!
The following layer can be activated by holding Space down. If you press the Space key short, a Space character is printed (when the Space key is released). If you want a continous printing of Space you have to hold down Space and press Alt.
The layer was designed like the Ebene 4 of the neo-layout.org – but not exactly.
Explanation in German:
Die Zeichen wurden so angeordnet, dass diese recht einfach zu erlernen sind.
Da bei der Programmierung die meisten verwendeten Sonderzeichen die Klammern sind, wurden diese auf die rechte Hand und in die mittlere Reihe gelegt. Da moderne IDEs bereits eine Klammer zu automatisch anhängen, wurden diese in die untere Reihe gelegt, da diese weniger verwendet werden. Vielmehr besteht nun der Anspruch, schnell an das Zeilenende zu gelangen und dann dort Enter zu drücken oder “{ und Enter” oder “( und Enter”. Diese Kombinationen wurden auf die obere Reihe der Tastatur gelegt.
Hier ein paar Eselsbrücken um sich die Belegung zu merken:
Die spitze Klammer auf zeigt nach links -> Zeigefinger nach links
Runde Klammer sieht aus wir das J unten.
Die rechte Seite vom K sieht aus wie {.
Die Eckigel Klammer ist eckig wie das L.
Die Klammer zu ist unter der Klammer auf.
Das Z ist das Ende des Alphabets. Mit Z springe ich zum Ende der Zeile und drücke Enter.
Über der geschweiften Klammer setze ich eine geschweifte Klammer an das Ende und drücke Enter.
Rechts daneben passiert das gleiche bloß mit einem Semikolen.
Das einfache Anführungszeichen ist klein wie der kleine Finger.
Das doppelte Anführungszeichen ist rechts daneben.
Das C sieht fast aus wie ein €.
A => Ausrufezeichen
F => Fragezeichen
G => Gleichheitszeichen
S => Stern (Mal)
usw…
Der linke Mittelfingeringer ist der senkrechte Strich und stellt die mittlere Stange eines Zelte dar.
Links daneben ist die eine Dachschräge (Slash)
Rechts daneben ist die andere Dachschräge (Backslash)
Da bei schnellem Tippen es häufig wesentlich effektiver ist, dass falsche Wort zu löschen und neu zu tippen wurde der “del word” Befehl auf Tab und Q gelegt.
Tools: VS Code, Google Colab, Lucid Chart, Eraser.io
Database Design: Level 2 ER Diagrams
Testing: Manual Unit and Integration Testing
Additional Skills: Transformers, NLP, Web Scraping, Semantic Textual Similarity (STS), Named Entity Recognition (NER)
Alert
Provided Codes don’t represent my complete work during internship and are Incomplete and partial. It’s only for preview and educational purposes. These are not the Final production grade codes either. Kindly use it with caution ⚠
Fake New Domains is an application designed to protect against phishing by detecting newly created domains and facilitating the creation of blacklists to prevent fraudulent sites efficiently. This tool helps users explore detected occurrences among newly created domains and prepares blacklists for potential fraudulent domains in the most agile way possible.
Features:
Phishing Detection: Identify newly registered domains that may be used for phishing attacks.
Domain Patterns: Select and analyze specific domain patterns.
Blacklist Creation: Easily create and manage blacklists of suspicious domains.
Automated Updates: Automatically fetch and update the list of new domains.
Usage:
Web Interface:
Use the dropdown menu to select the domain pattern you want to analyze.
Click on “Add Selected” to add domains to the list.
Use the buttons to export the selected domains o clear the list.
Contributing:
Fork the repository.
Create a new branch (git checkout -b feature-branch).
Make your changes and commit them (git commit -am 'Add new feature').
Push to the branch (git push origin feature-branch).
Create a new Pull Request.
How to try:
You can use docker, to do that you only have to execute the followed command:
docker pull juanse77/fake-new-domains-web:latest
docker run --rm -p 5000:5000 juanse77/fake-new-domains-web:latest
use v6.c;

use META6::bin :HELPER;

&META6::bin::try-to-fetch-url.wrap({
    say "checking URL: ⟨$_⟩";
    callsame;
});

META6::bin::MAIN(:check);
General Options
--meta6-file=<path-to-META6.json> # defaults to ./META6.json
Create Options
--name
--description
--version # defaults to 0.0.1
--perl # defaults to 6.c
--author # defaults to user/name from ~/.gitconfig
--auth # defaults to credentials/username from ~/.gitconfig
New Module Options
--new-module=<Module::Name::Here>
--description="some text" # added both META6.json and README.md
--base-dir # the $*CWD for all local file operations
Will create a new module project in a new directory with a name prefixed with
create.prefix (default raku-), setup git, push it to github (See Github
below). The skeleton from the config dir ~/.meta6 will be applied (see Config
Dir below).
Fork Module Options
--fork-module=<Module::Name::Here> # module name as to be found in the ecosystem
This will seach a module by name in the ecosystem. If it’s a github repo that
repo will be forked and cloned to the local FS. If there is a META6.info but
no t/meta.t, the file and its dependancy will be added and commited to the
local git repo.
Pull Request Options
--pull-request
--title=`git log|head 1` # defaults to last commit message
--message=''
--head=master # branch in your fork
--base=master # branch in upstream repo
--repo-name # defaults to repo name provided in META6.info
Pull request need to tell github where to create the PR at. That in turn
requires a proper META6.json to get the repo name from.
Releasing a module
To create a release on github use --release. The optional parameter
--version takes a string that is used as a version and stored in the
META6.json-file. Versions can be incremented with +, ++, +++ for the
parts of a version with the form 1.2.3. A single + will change the
revision, ++ the miner version and +++ the major.
A github-tag will be created and is the base of the release. The source-url
field in the META6.json is set to the tarball of the release on github.
Config Dir
The config dir resides at ~/.meta6 and holds a folder called skeleton for
additional files to be copied into any new project. This is where you put your
default LICENSE or alternate .gitignore.
The config dir, a default meta6.cfg and its default subdirs are created with
--create-cfg-dir.
Any executable under pre-create.d, post-create.d and post-push.d are
sorted and executed with a timeout of 60 seconds each. Files that end in ~
are filtered out.
The config directory can hold a github-token.txt file that is used to help
curl to connect to github. The token
needs the scopes repo, user/read:user and user/email. Please note that
git itself can handle a ~/.netrc-file and github will accept a token
instead of a password.
Github
To be able to talk to github your git-config requires a section as follows.
SPOJ (Sphere Online Judge) is an online judge system with over 640,000 registered users and over 20,000 problems. Tasks are prepared by its community of problem setters or are taken from previous programming contests. SPOJ allows advanced users to organize contests under their own rules and also includes a forum where programmers can discuss how to solve a particular problem.
Apart from the English language, SPOJ also offers its content in Polish, Portuguese and Vietnamese languages. The solution to problems can be submitted in over 40 programming languages, including esoteric ones, via the Sphere Engine. It is run by the Polish company Sphere Research Labs.
The website is considered both an automated evaluator of user-submitted programs as well as an online learning platform to help people understand and solve computational tasks. It also allows students to compare paradigms and approaches with a wide variety of languages.
What we are trying to do
We will provide you with the solutions in Python. You can use it as reference whenever you feel like you are stuck.
All the solutions are in separate folder. The name of the folder is exactly the same as the name of the problem. Also, folder name consist of a number enclosed in []. It tells the
ID number of the problem on SPOJ Website.
Priority queue traits and high performance d-ary heap implementations.
no-std: This crate supports no-std; however, std is added as a default feature. Please include with no-default-features for no-std use cases: cargo add orx-priority-queue --no-default-features.
A. Priority Queue Traits
This crate aims to provide algorithms with the abstraction over priority queues. In order to achieve this, two traits are defined: PriorityQueue<N, K> and PriorityQueueDecKey<N, K>. The prior is a simple queue while the latter extends it by providing additional methods to change priorities of the items that already exist in the queue.
The separation is important since additional operations often requires the implementors to allocate internal memory for bookkeeping. Therefore, we would prefer PriorityQueueDecKey<N, K> only when we need to change the priorities.
See DecreaseKey section for a discussion on when decrease-key operations are required and why they are important.
B. d-ary Heap Implementations
d-ary implementations are generalizations of the binary heap; i.e., binary heap is a special case where D=2. It is advantageous to have a parametrized d; as for instance, in the benchmarks defined here, D=4 outperforms D=2.
With a large d: number of per level comparisons increases while the tree depth becomes smaller.
With a small d: each level requires fewer comparisons while the tree with the same number of nodes is deeper.
Further, three categories of d-ary heap implementations are introduced.
1. DaryHeap (PriorityQueue)
This is the basic d-ary heap implementing PriorityQueue. It is the default choice unless priority updates or decrease-key operations are required.
This is a d-ary heap paired up with a positions array and implements PriorityQueueDecKey.
It requires the nodes to implement HasIndex trait which is nothing but fn index(&self) -> usize. Note that usize, u64, etc., already implements HasIndex.
Further, it requires to know the maximum index that is expected to enter the queue. In other words, candidates are expected to come from a closed set.
Once these conditions are satisfied, it performs significantly faster than the alternative decrease key queues.
Although the closed set requirement might sound strong, it is often naturally satisfied in mathematical algorithms. For instance, for most network traversal algorithms, the candidates set is the nodes of the graph, or indices in 0..num_nodes. Similarly, if the heap is used to be used for sorting elements of a list, indices are simply coming from 0..list_len.
This is the default decrease-key queue provided that the requirements are satisfied.
This is a d-ary heap paired up with a positions map (HashMap or BTreeMap when no-std) and also implements PriorityQueueDecKey.
This is the most general decrease-key queue that provides the open-set flexibility and fits to almost all cases.
Other Queues
In addition, queue implementations are provided in this crate for the following external data structures:
std::collections::BinaryHeap<(N, K)> implements only PriorityQueue<N, K>,
priority_queue:PriorityQueue<N, K> implements both PriorityQueue<N, K> and PriorityQueueDecKey<N, K>
requires --features impl_priority_queue
or --features impl_all
This allows to use all the queue implementations interchangeably and pick the one fitting best to the use case.
Performance & Benchmarks
You may find the details of the benchmarks at benches folder.
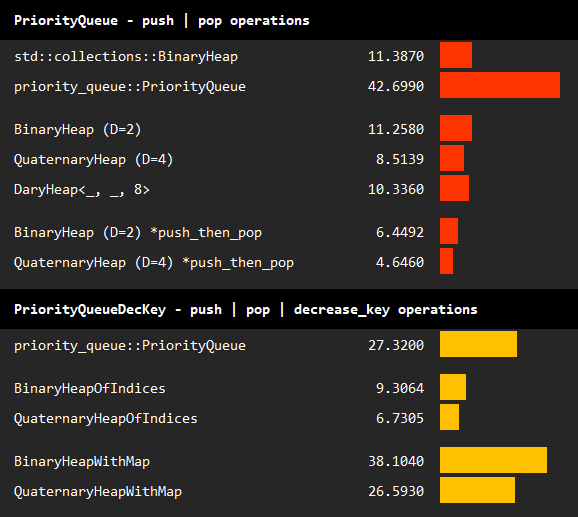
The table above summarizes the benchmark results of basic operations on basic queues, and queues allowing decrease key operations.
In the first benchmark, we repeatedly call push and pop operations on a queue while maintaining an average length of 100000:
We observe that BinaryHeap (DaryHeap<_, _, 2>) performs almost the same as the standard binary heap.
Experiments on different values of d shows that QuaternaryHeap (D=4) outperforms both binary heaps.
Further increasing D to 8 does not improve performance.
Finally, we repeat the experiments with BinaryHeap and QuaternaryHeap using the specialized push_then_pop operation. Note that this operation further doubles the performance, and hence, should be used whenever it fits the use case.
In the second benchmark, we add decrease_key_or_push calls to the operations. Standard binary heap is excluded since it cannot implement PriorityQueueDecKey.
We observe that DaryHeapOfIndices significantly outperforms other decrease key queues.
Among BinaryHeapOfIndices and QuaternaryHeapOfIndices, the latter with D=4 again performs better.
C. Examples
C.1. Basic Usage
Below example demonstrates basic usage of a simple PriorityQueue. You may see the entire functionalities here.
use orx_priority_queue::*;// generic over simple priority queuesfntest_priority_queue<P>(mutpq:P)whereP:PriorityQueue<usize,f64>,{
pq.clear();
pq.push(0,42.0);assert_eq!(Some(&0), pq.peek().map(|x| x.node()));assert_eq!(Some(&42.0), pq.peek().map(|x| x.key()));let popped = pq.pop();assert_eq!(Some((0,42.0)), popped);assert!(pq.is_empty());
pq.push(0,42.0);
pq.push(1,7.0);
pq.push(2,24.0);
pq.push(10,3.0);whileletSome(popped) = pq.pop(){println!("pop {:?}", popped);}}// d-ary heap generic over const dconstD:usize = 4;test_priority_queue(DaryHeap::<usize,f64,D>::default());test_priority_queue(DaryHeapWithMap::<usize,f64,D>::default());test_priority_queue(DaryHeapOfIndices::<usize,f64,D>::with_index_bound(100));// type aliases for common heaps: Binary or Quaternarytest_priority_queue(BinaryHeap::default());test_priority_queue(QuaternaryHeapWithMap::default());test_priority_queue(BinaryHeapOfIndices::with_index_bound(100));
As mentioned, PriorityQueueDecKey extends capabilities of a PriorityQueue. You may see the additional functionalities here.
use orx_priority_queue::*;// generic over decrease-key priority queuesfntest_priority_queue_deckey<P>(mutpq:P)whereP:PriorityQueueDecKey<usize,f64>,{
pq.clear();
pq.push(0,42.0);assert_eq!(Some(&0), pq.peek().map(|x| x.node()));assert_eq!(Some(&42.0), pq.peek().map(|x| x.key()));let popped = pq.pop();assert_eq!(Some((0,42.0)), popped);assert!(pq.is_empty());
pq.push(0,42.0);assert!(pq.contains(&0));
pq.decrease_key(&0,7.0);assert_eq!(Some(&0), pq.peek().map(|x| x.node()));assert_eq!(Some(&7.0), pq.peek().map(|x| x.key()));let deckey_result = pq.try_decrease_key(&0,10.0);assert!(matches!(ResTryDecreaseKey::Unchanged, deckey_result));assert_eq!(Some(&0), pq.peek().map(|x| x.node()));assert_eq!(Some(&7.0), pq.peek().map(|x| x.key()));whileletSome(popped) = pq.pop(){println!("pop {:?}", popped);}}// d-ary heap generic over const dconstD:usize = 4;test_priority_queue_deckey(DaryHeapOfIndices::<usize,f64,D>::with_index_bound(100));test_priority_queue_deckey(DaryHeapWithMap::<usize,f64,D>::default());// type aliases for common heaps: Binary or Quaternarytest_priority_queue_deckey(BinaryHeapOfIndices::with_index_bound(100));test_priority_queue_deckey(QuaternaryHeapWithMap::default());
C.2. Usage in Dijkstra’s Shortest Path
You may see below two implementations of the Dijkstra’s shortest path algorithm: one using a PriorityQueue and the other with a PriorityQueueDecKey. Please note the following:
Priority queue traits allow us to be generic over queues. Therefore, we are able to implement the algorithm once that works for any queue implementation.
The second implementation with a decrease key queue pushes some of the bookkeeping to the queue, and arguably leads to a cleaner algorithm implementation.


 https://github.com/vthanhsang/Food-app